Monday, August 28, 2006

Sprucing up the Radiator Shroud

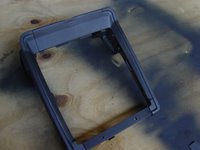
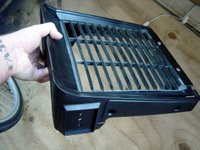
So I was looking through all my miscellaneous parts and thought that the radiator shroud would be something good to start on. The shroud is basically a metal frame with a plastic grille that protects the radiator from getting beat up. Here is a picture of how it looked when it came with the bike. Big, ugly and … ugly. Look at the reflectors on the side. I mean nothing says tough than a set of reflectors.


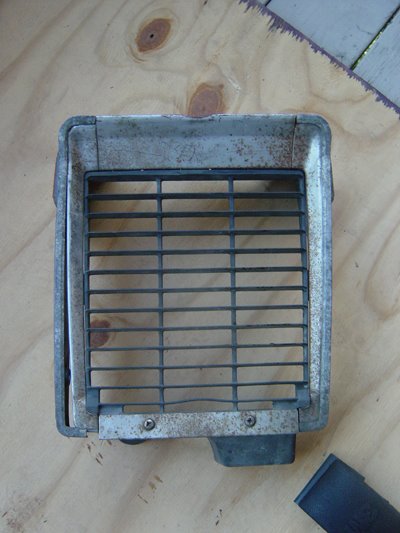
So here it is up close and personal. There is some light surface rust on the outside but when you flip it over the inside was covered in rust. The shroud is made of five parts, the grille, the top, the two sides and the bottom. However, for me it was only three parts because the top and sides were rusted together, nice.


So I started sanding it down by hand. That was taking too long for me so I bought this stuff called “rust fix”. You spray it on rusted areas and it seals the area, eats the rust and turns it black. Now the shroud looks like a Dalmatian.


Next I sanded it down and sprayed on the primer. Flat black of course. Almost done.


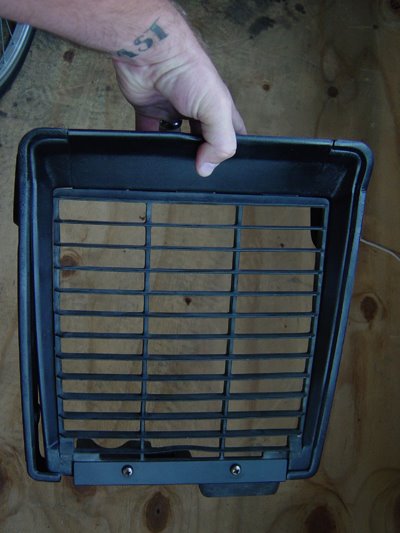
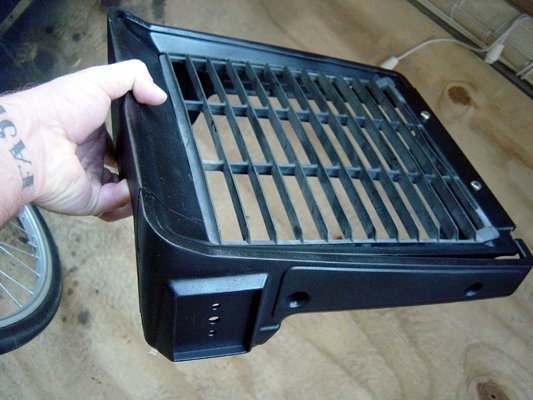
Then I had to lightly sand it again and put the finish paint on it. Here is the shroud ready to mount (if only the bike was ready for it).
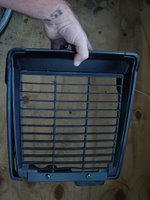


Tuesday, August 22, 2006

Cleaning up

So today I went to the storage unit and started cleaning up my bike. Everytime I go and work on it looks like I got into a fight with a dirt clod and lost. So I started to wipe it down with a mild mixture of soap and water (the suggested Clymer's remedy). Because the engine is not out I was not able to get to every part. Also the front end needs to be taken off (which I plan to do in the future to change the tire) so I can clean that whole thing. I also started to take a look at all the wires. There are wires everywhere. I think I will need to call Carpy and ask is he can give me some pointers and how to minimize the amount of wires running on the beast. I know I can get rid of some of those, the question is which ones? So it's slowly coming along. I have to wait till we get some money before I can start ordering parts, so whatever I can do in the meantime I will try to do.

Here are some updated pictures of the handle bars and the bike.


Saturday, August 19, 2006

Mock up 1

So I am always thinking up new things for the bike. Just ask my wife, she'll tell you. I was talking to my friend Chris about gas tanks and he said to mock it up- see what it would look like with the actual tank on it so you know what it will look like. Right now with the bike almost completely apart, I thought I would do a fake mock up in photoshop. So here is the first round. The tank is a peanut tank, a little oversized for the picture but it gives the bike an interesting look. I really like the shape and size of the old BSA tanks, so I'll probably do another version with one of those. The exhaust is exactly how I want it to look, wrapped black with a fish tail tip. The seat was really hard to do. It's not how I want it to look but that's how it ended up in this phase. The seat I want is one that Carpy made. He makes them out of your old seat however you want it. The ideas keep rolling in so stay tuned for more goodness.

Friday, August 18, 2006

Work continues

While I was at Carpy's I noticed these little cones coming off of the carburetor. I asked him about it and he told me to get rid of my air box and put those on instead. They look much cooler, improve performance, and there is less stuff on the bike. Here is bike with the air box.


So Carpy says "rip the bloody thing out", this is easier said than done. The box is molded perfectly to fit in between the frame. On one side you have the battery, on the other it' open. But the thing does not want to move. I took off the top of the box, giving me more room to work with but my main problem was two drainage tubes that were coming from the bottom of the box. These tubes were very hard to get to, unless you crawl underneath the bike, which I did. As soon as I pulled them out liquid started draining from the box. It smelled like gas but felt like oil, that was a nice little mess. Even when those were out I had to man handle it to get it out. The splendor of my victory.


Next, I replaced my old handle bars with my new ones. Not too hard, except these bars are very short and all the cables are very long. I tried to run the cables through different areas, however, some were still long so I am going to have to shorten them or get new ones. Here are the clubman bars on the beast.


Last business of the day, I took off that hideous headlight. What a nightmare of wires, look at medusa. Here is a clean up project waiting to happen.

Monday, August 14, 2006

Carpy's

Today Spencer and I went to Carpy's. Man, was that guy cool. He is super laid back and funny as hell. He said that the CX500 was what he started on and that they are good bikes. He gave me some great ideas and some tips on how to get the engine running. If the bike was back together I could have just done some very small things and got it up and running (hopefully). Oh well. For now I am going to hold off on taking the engine out and am going to clean it up. That way I can put it back together clean and try those trick, and hopefully be tearing up and down the street in no time. Sorry I don't have any pictures, but just go to his site, he honestly works out of his two car garage. He says he is an honest hard working guy that makes affordable bikes for other honest hard working guys, and that's awesome. Well, on to the clean up.

Saturday, August 05, 2006

The breakdown continues...

So these are basically the last steps before the engine can come out. After this there is really not much else except removing the engine cradle, disconnecting the drive shaft, loosening the rear bolts that hold the engine to the frame and then removing the engine.

So this is what I did today. First I had to remove the upper engine mounting plates. If I didn't do this, there would have been no way that I would have been able to get the carburetor out.


Next, I removed the crankcase breather tubes from the heads.


After that I removed the carburetor. To do this I had to first remove the front intake tubes that are connected to the cylinder heads, then loosen the rear tubes. Next, I removed the choke and throttle cables, which is way easier than it sounds. Then pulled the thing free. The lack of enthusiasm in my writing can tell you how much fun this was.


Next I removed the shifter lever. I was stoked to find out you can adjust how high or low it sits (it was way too low before).


I then had to take out the starter. Man that thing was heavy, talk about a bag of rocks.


The clutch cable had to be disconnected from the clutch housing. Holy crap, that bugger did not want to come out. I had to loosen the bolts that held it tight, disengage the cable from the hand lever, and wrestle that monkey to the ground. However hard I tried, that thing did not want to come out. After taking the bull by the horns it finally came to submission.


While I was working on stuff I said to myself "hey, why don't I take off the rear fender"? So I did. Man, look at that tail light. That thing is huge! You know that thing has got to go. Anyone want a tail light?


As always, here is a final look of the bike so far. enjoy.

Wednesday, August 02, 2006

Preparation Continues...

So the rear lights were just hanging off the back of my bike, clanging around everytime I moved the thing. So I cut them off. I have new ones already picked out so this was not a big deal. Anyone want a pair of rear turn signals?


The next step in the process was to remove the radiator. First I had to loosen the hose clamps then take out the bolts that held it to the frame. Then I was suppose to slide the thing out. I was able to get the bottom hose off but there was still some fluid in the block. So I had to put it back on and get a pan to drain the rest of it out. The top hose did not want to come off and I did not want to force it just in case I damaged the radiator. After awhile it finally came off.


Then it was time to drain the oil. I loosened the bolt to drain the oil, then dropped the filter into the pan. That was a fun mess to clean up. Clymers said to take out the dip stick but oil started coming out of there too. Latex gloves are a godsend.


Next I had to loosen the rear brake adjuster screw.


Then I removed some of the wiring harness clips and disconnected the coil electrical connectors. I also had to disconnect the thermostat and oil pressure connectors. Electricity????


Last but not least the coils had to come off. I pulled the disconnected wires free then unscrewed the coils from the frame. Picture 1- coil. Picture 2- frame no coil.


Here is look at the bike so far. It doesn't look much different than the last time but you can totally notice the missing radiator. Sweet.

8/1/06 Parts...

So I came home and a box was waiting for me on my doorstep. My first purchase for the bike, Clubman handle bars from airtech-streamlining. These guys were out of stock for at least three weeks but now they are finally here. You're suppose to make the bike look good then run, right? It might be awhile before I install these but at least I was able to get them. For good vintage parts check out airtech online: http://www.airtech-streamlining.com